This is a tutorial, not an expose! To say that I use a lot of Silvered Ivory Stringer (SIS) is a huge understatement, and I thought that I would show how I make my version of the stringer. It would give non lampworkers a look at one of our techniques, and it would give away my trade secrets to allow me to share with my fellow lampworkers.
What is SIS? I’m quoting Lori Greenberg as explained at Glass Arts on Craft Gossip:
It’s ivory glass, rolled in fine silver foil and then pulled into long glass strings (stringer). These stringer are used as an artist would use a pencil or paintbrush…to melt on fine designs. The reaction of the silver and ivory form a webbing and curdling effect that is both organic and mesmerizing.

Hidden Glade - Bead using Silvered Ivory Stringer
Items used:
- Ivory Glass ( my go-to glass is Effetre Dark Ivory) – 1 rod
- Clear Glass (Vetrofond clear) – 2 rods
- Fine Silver Foil (this is important – Foil, not Leaf)
- Sharp Knife (such as Exacto brand)
- Graphite Marver
- Water
- Mashers
- Torch & flame!
The short version:
- Prepare the foil
- Make an ivory plug
- Apply the silver leaf to the ivory
- Burnish the silver
- Heat
- Pull
These are the same steps that many lampworkers would use (I would say all lampworkers, but I’m an engineer too, so I just can’t bring myself to make that strong of a statement…), however, I do some things in my own specific way, so that I have a repeatable and reliable result.
This tutorial also quite long, so I’m splitting it into several posts. For a teaser, here is how I prepare the silver foil.
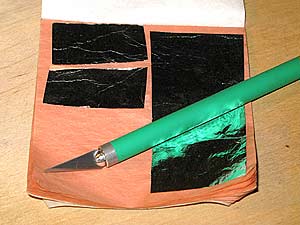
First of all, notice that I use fine silver foil. It seems to give a better result, and it is easier to work with than fine silver leaf. I get one piece of foil and place it in the front of the foil booklet. I then cut it into 8 mostly equal pieces with my razor knife. I slice it in half, then I slice one side into halves and finally each of those quarters in half. I hold the foil with my other hand so that it does not bunch up. I just estimate where the cuts should be – that is close enough. With practice, it is easy to tell how much pressure to use to make a nice cut.

Silver Foil cut by Razor Knife
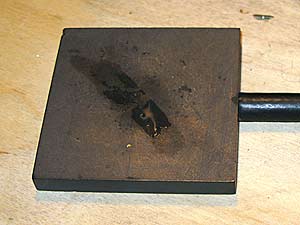
Next, I place a tiny amount of water onto my marver, with the water concentrated on the side away from me. The water holds the foil down so that it does not blow away or fold onto itself.

Graphite Marver with Drop of Water
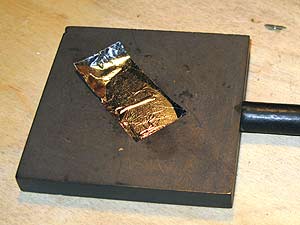
Finally, I put one piece of the foil onto the marver. I try to make sure that the edge of the foil closest to me is not on the water; I want that edge loose so that it will stick to the glass easier. If the edge is on the water, as it is in the photo, it just makes it a little harder to pick up the foil. Even more important, there needs to some room on the marver on the edge closest to me.

Graphite Marver with Fine Silver Foil
So now the foil is prepared. Next up? Plugging Along! (Making the ivory plug.)
All material contained within this Tutorial is protected by Copyright, “Spawn of Flame” Rosemarie Hanus, 2009; all rights reserved.
Rosemarie Hanus makes beads in her home studio. Almost all of them use Silvered Ivory Stringer – Look at these beads at Etsy, Art Fire, or her Spawn of Flame website.


March 31st, 2009 at 8:45 am
good how to. i will be waiting for the next article
March 31st, 2009 at 10:01 am
Wow! Rose, I was just going to make some sis today. Do I have to wait until tomorrow now? I guess so! Thanks for the tutorial.
March 31st, 2009 at 10:48 am
[…] sure to stop by for the tutorial. Part 1 is up today and I’m sure that part 2 is soon to follow. Thanks […]
March 31st, 2009 at 6:27 pm
[…] Revealed – Part 2 – Plugging Along March 31, 2009 — rosemarie h. Continuing the tutorial, here is another of my “secrets”. I use a clear core in my stringers. It gives me a […]
March 31st, 2009 at 7:50 pm
The last post will be up at around 8:30 Eastern Daylight Savings time on April 1.
April 1st, 2009 at 7:11 am
[…] Stringer Revealed tutorial is to apply the silver to the ivory. (In case you missed it, part 1 is here and part 2 is […]
April 1st, 2009 at 9:02 am
[…] this Silvered Ivory Stringer Revealed tutorial in this post. (In case you missed it, part 1 is here, part 2 is here, and part 3 is […]
April 7th, 2009 at 9:50 am
Thank you Rose-
This is a great tutorial. I love the pictures and every steip is explained clearly and is easy to understand- what a nice job. I appreicate you taking the time to do this, and the clear core is a great hint. Love your beads! Laura
August 31st, 2010 at 2:23 pm
[…] you can find all kinds of glass bead making tutorials. Today I’m sharing some I really like. Silvered Ivory Stringer is one of the coolest component parts a bead making can make and use. Silver foil is mixed up with […]
January 27th, 2011 at 2:50 pm
[…] most popular series of posts explain how to make a certain element (called Silvered Ivory Stringer) that is used to embellish […]
January 30th, 2011 at 9:33 am
[…] most popular series of posts explain how to make a certain element (called Silvered Ivory Stringer) that is used to embellish […]
February 1st, 2012 at 12:50 pm
Id love to subscribe to this blog, but can’t figure out how to do so! Thanks in advance for any help you might give me. Suzanne 🙂
November 11th, 2016 at 6:34 pm
Fantastic Site, Maintain the great job. With thanks! http://bit.ly/2f0xJ92